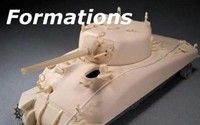
Hey there, fellas! This project has been percolating along recently, since I was cajoled into participating in a Sherman group build over on the Plastic Armour site. Build what you like, starting September 1st, and finish by January 31st 2015. Many of you know that such a time frame is frighteningly fast for me. But the model is coming along: Tasca M4A2 DV hull, my own M50 turret reworked (I used a rejected casting and converted it to applique cheek), Dragon suspension and eventually tracks, Aaron Schmishney's 3D-printed can racks, Shapeways grouser bin covers and periscope guards, and other detail corrections. This is what it looks like now:
"You could probably use some armor. A Sherman can give you a very nice...edge!"
Looks great Greg.How easy/hard was it to mate the DML suspension to the Tasca hull?
Pretty straightforward, actually. Not quite as easy as a Tasca accessory HVSS would have been, but I didn't have a complete one sitting around and with time not on my side I didn't want to wait for one to be ordered from somewhere. The only things that take some care is ensuring that the HVSS mounting pads fit exactly where the VVSS ones were before, and measuring carefully for the placement of the return roller brackets. I might be off by a thousandth of an inch or two, but that's less than 3/4" full size and the actual placement was likely to be within that kind of accuracy on these suspension refits. I had a Dragon M51 Premium kit that had been consigned to the IDF Sherman spares bin anyway, so I swiped the suspension and got to work. The return roller wheels are a little too large, but I didn't feel that I had the time to send out Tamiya or Tasca parts to be cast in resin. I do like the detail on the Dragon suspension bogies, though their attachment method to their hull plate is less secure than Tasca or Tamiya (which doesn't articulate, either). Oh, and the bottom plate needed the lateral stiffeners trimmed back and a little grinding done to the contour for the forward bogie mounts so that the larger bottom pieces for the HVSS would fit. Here too, an actual tank would have required similar work since the HVSS wasn't a drop-fit into the existing VVSS holes on the bottom of the hull.
I just noticed that I didn't file the relief cuts into the lower hull corners for wheel clearance, so I'll have to try to carefully do that. I've also got just about all the Aber pioneer tool brackets cut out, trimmed up, bent to shape, and superglued to .005" styrene sheet. I'll trim them out, and be able to attach them to the hull with an ordinary plastic glue joint. Invariably, these tanks in service had no tools at all fitted so empty fittings are the way to go. I'll need to make or swipe a bunch of footman's loops, too.
"You could probably use some armor. A Sherman can give you a very nice...edge!"
We're getting closer to that wash-and-dry-it-carefully stage, and then primer. I still need to add the searchlight mount atop the gun mantlet, and add wires to the antenna mounts. I might leave one or both of the armored deck doors open; filling in the ejector pin marks on the bottoms just in case I do. I've detailed up the phone box, and left all the tools off. I won't add tie-downs for the can racks. I do have them from Aaron's set, but the can racks are fragile...I'm on my second set getting this far...and I don't want to risk busting another one or two just to add those little bits. I'll probably put cans of some sort in them anyway. Mixtures of IDF cans and ordinary ones are evident, so I might mix 'em up and include a couple of red civvie ones as well.
"You could probably use some armor. A Sherman can give you a very nice...edge!"
And a couple more. Site or my browser wanted to hang up after loading two. The Ma Deuce is Dragon, and so is the infantry phone box. I detailed that up with a power cord in back (not seen here), standoffs, grab handle, hinge rod, light and cover, and the door spring on the bottom. The little spring was a real PITA to do. I have another one of these that I'll make copies of, but I doubt that I'll try to have it cast with the spring on it. I think it will tear up the mold. We'll see, I'll run it by Steve Reid and see what he says. The second one does have holes drilled for the handle, and those will cast well enough. All I need is a depression to start a drill bit.
I mentioned Aaron's can racks being fragile, and they are, but most of my breakage was due to my own impatience in wanting to see them in place. There were other things not yet done at the time I installed them, and returning to those tasks left the racks especially vulnerable to handling damage. My bad.
"You could probably use some armor. A Sherman can give you a very nice...edge!"
I just got a set of those can racks, good to know..... This is pure Sherman porn, love it. Got a question: I know M50's went through a pretty complete tear-down during the conversion process, how plausible do you think it would be to see a VVSS -A4 hull with the double-brake trans cover? I have the hull and suspension all ready to go, but none of the early cast covers, like what you're using, and would need to do a bunch of hacking to get a 3-piece cover back on.
I just got a set of those can racks, good to know..... This is pure Sherman porn, love it. Got a question: I know M50's went through a pretty complete tear-down during the conversion process, how plausible do you think it would be to see a VVSS -A4 hull with the double-brake trans cover? I have the hull and suspension all ready to go, but none of the early cast covers, like what you're using, and would need to do a bunch of hacking to get a 3-piece cover back on.
Russ, a radial-engine VVSS M50 with the late cover would be uncommon but certainly plausible. There were M4 Composite-based M50s that wore 3-piece diffs, and normal sharp-nosed double-brake diffs on wet-stowage hulls converted. Mix and match. The later in service the more likely to see your combination, I think. The IDF usually kept only a fraction of their inventory in service, and reserve regiments rotated through training using the same tanks (their own retained in ready storage for war). So wear and tear was concentrated on only a portion of the tank fleet, and you would expect those to be the ones which broke down most often. I would think it perfectly plausible that a broken 3-piece unit was replaced by an available sharp-nosed double-brake spare particularly by the 1960 time frame when some of these tanks at least had seen about four years' service.
"You could probably use some armor. A Sherman can give you a very nice...edge!"
Good to hear, I really was not looking forward to trying to get the sharp-nosed cover off. I originally had a 3-piece cover on, but it's the old one that had the final drives too high, so when I went to "fix" it, I was thinking I would do the Cummins VVSS hull I discussed with you earlier, and felt it would be more likely to be there in that scenario. Now that I'm going to use this hull for a "T", I was less than sure about it. BTW, I'm saving the turret I got from you for a HVSS 3-piece cover build and will use an old MP products or possibly a late Dragon turret on this one. Thanks, and sorry for the hi-jack.
One question: what kind of painting did the Lebanon Army use? Were these tanks repainted, or had the original israeli colors?
They were repainted, Antal. The SLA used a rather pale blue-grey color overall, with some tanks also painted with irregular stripes of dark blue or olive drab. The Phalange also received M50s, and painted theirs in a very dark green color with no camouflage. Lebanese Army vehicles were a pale sand color, and that still predominated when the army split into factions and equipment fell into the hands of the various militia forces. The militias would sometimes add a camo color, and frequently added Arabic text in various places and colors. The text could spell out a slogan (political or the common "God is Great"), or spell out the name of the organization which operated the vehicle (PLO, Amal, etc.)
"You could probably use some armor. A Sherman can give you a very nice...edge!"
I like primer..... The periscope guards look very close to actual scale size. Any difficulties with them?
Yes. They're Shapeways parts, and very nicely detailed. But extremely brittle, and getting them off the backing sheet is difficult. The designer suggests using a fresh, sharp #11 blade but I found that the force required still broke the parts. Eventually I settled on wet sanding them on coarse, medium, and fine nail buffing sticks until the backing became translucent. Then I sliced out the part, and used a fine needle file to clean up. Even doing that the breakage rate was about 30%. Frankly, I'm still not sold on any one solution for Sherman light guards and periscope guards. Kit parts are always too thick; P/E brass is too thin and has too little surface for adhesion. Steve Zaloga likes using them with a particular epoxy putty that's very gummy and stretchy; I find it difficult to work with and it doesn't solve the dimensional problem. I know that someone has done periscope guards in white metal, but I can't recall who and haven't bought any.
"You could probably use some armor. A Sherman can give you a very nice...edge!"