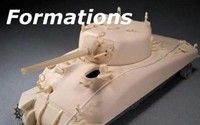
Dragon M4A1 kit, been sharing this build kind of a step by step on the local clubs Facebook page. Will be doing some detailing, and using a turret from the parts box as I messed up on the kit one and added the applique armor.
Oh I believed you, just never seen this in any of my reference materials at all. Thanks for the picture and I DID learn something new today. Now the bigger question is what plant made these and how many were built? Were they for ALL low bustle small hatch A1's?
I do like learning new information... pretty exciting. LOL
Going to keep an eye on your build as there are some pretty cool things going on here.
Coming along nicely, Speedster! I presume you're OK with the hull being too wide; it will stick out noticeably beyond the vertical plane of the suspension. It's the only thing really off on that kit. Paul Budzik on his site has an article on how to correct it, but it's a lot of work and you're way past that stage. Those odd rear light guards are unique to Lima-built tanks.
"You could probably use some armor. A Sherman can give you a very nice...edge!"
Oh I believed you, just never seen this in any of my reference materials at all. Thanks for the picture and I DID learn something new today. Now the bigger question is what plant made these and how many were built? Were they for ALL low bustle small hatch A1's?
I do like learning new information... pretty exciting. LOL
Going to keep an eye on your build as there are some pretty cool things going on here.
Thanks,
No worries, maybe I should have added the pictures in the first place
Coming along nicely, Speedster! I presume you're OK with the hull being too wide; it will stick out noticeably beyond the vertical plane of the suspension. It's the only thing really off on that kit. Paul Budzik on his site has an article on how to correct it, but it's a lot of work and you're way past that stage. Those odd rear light guards are unique to Lima-built tanks.
Well I never really thought I would go this much into the build. I just want to use up most of my stash before getting better kits and thought this might be a way to take one from the box to the shelf. Been fun
Coming along nicely, Speedster! I presume you're OK with the hull being too wide; it will stick out noticeably beyond the vertical plane of the suspension. It's the only thing really off on that kit. Paul Budzik on his site has an article on how to correct it, but it's a lot of work and you're way past that stage. Those odd rear light guards are unique to Lima-built tanks.
Coming along nicely, Speedster! I presume you're OK with the hull being too wide; it will stick out noticeably beyond the vertical plane of the suspension. It's the only thing really off on that kit. Paul Budzik on his site has an article on how to correct it, but it's a lot of work and you're way past that stage. Those odd rear light guards are unique to Lima-built tanks.
Oops! Should have looked closer at the reference pile before I spoke. At any rate, that Sherman minutia link does illustrate both Lima and PCF variations, both of which were a little weird. One other thing I'll note about this: Some of these early hulls got converted to M32B1s, so you could tweak the Tasca/Asuka kit with these and a few other detail changes to make for a more unique tank retriever.
"You could probably use some armor. A Sherman can give you a very nice...edge!"
Okay for the paint. This has been an adventure I'll tell you. Here is the lay of the story. I really do not use Tamiya acrylic paint or any acrylic paint as it has been hit and miss for me. On that note I really like how some modelers are getting a neat look with pre-shading when using a acrylic paint. I have been wanting to try it for a little while now, so this became came my victim. Your going to have to bear with me as a learn this and what not to do.
first shot with Tamiya white and black. No I did not use a primer as I use either Floquil or an automotive primer (really really reduced. I have had reactions with Tamiya paint when using both. So I just shot the thing with plain flat white.
then shot on some Tamiya Khaki Drab color, lighter than black but darker than OD
Over shot the pre-shade with thin Tamiya OD, and yes when a couple coats to much.
One thing that popped up first is the Shapeway parts now seem to be leaking!!!
added the missing strap that was pointed out to me
I still can't seem to get to get as fine as I can enamel as I get over spray with trying to do camo. So I used silly putty to outline where I wanted the camo to be.
I then shot it with Tamiya German gray for the black. Should have darkened it some, again live and learn. So I go to pull off the silly putty and ended up with a number of issues here. One it worked good for the outline. Two it left an outline of where it was. Three is stuck like mad in places and even pulled up parts, paint etc. At this point I'm so mad at myself for even trying this, but got to go on and I do.
I ended up going on and paint on the markings
I was still frustrated with the paint and took a break.
After a little break, I figured I'll just shoot with some Testors lacquer clear and see what happens. I spoke to a guy on another forum and was suggested to hit it with a acrylic clear. I did not have any and living in a small town and not wanting to drive 400 miles round trip to get some, I used the Testors I had. I was afraid it would lift the paint, but when I walked away seemed to be laying down good.
Okay I think I'm back on track more later in the week.
Went for a repaint, new base, OD, black/gray, markings, and clear coat. I free handed the camo this time and I like it better. I know 99% that for real it was painted by hand that would give it hard edge.