Let me introduce myself: My name is Antal Bujdoso from Hungary, and this is my entry to this Sherman Forum. My favourite WWII tank is the Sherman.
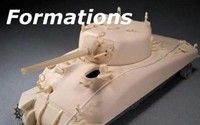
This is an M4A1 76W early from the 3rd AD jan, 1945. The unique of this tank the add on armor on the front, the swapped cupolas on the turret, and the two par boxing gloves on the shield. The model is mixed from various parts. The hull is from the old Italeri M4A1, the T23 turret is from Academy, the running gear is Academy too (from M10), the other little parts are, Dragon, Academy, Tasca, and some left over parts. The tools are still missing. The track will be Dragon T48 seperate track links (from the old M4A1), with AFV duckbills.
There are some question about the painting:
- has this tank black camo over the OD - as I know, these tanks had a circled star on the top of the turret. Is it right?
Looks great. With all the extra miles you went with detailing and scratch building, I would recommend getting rid of the bed rolls and replacing them with higher quality ones. Unless you going to cover them with a trap.
Post by Allied-Eric on Dec 23, 2013 23:14:36 GMT -5
Antal this is an awesome A1! I have always like the added armor shown in your reference photo and you have done some really great detail work...waiting for an update and don't forget them boxing gloves!!
Allied-Eric
Vancouver, WA, USA
AMPS-2652
-In the Ready Rack-
Improvised Assault Sherman-M4A3DS(ETO)
Hyper-Sherman
Crispy-44
Antal this is an awesome A1! I have always like the added armor shown in your reference photo and you have done some really great detail work...waiting for an update and don't forget them boxing gloves!!
Erik! There are the boxing gloves. Two of them made by one of mine friends, and two are made by myself. I had a year break in my modelling life because of my family (baby borned) and a new workplace. But I'm on the board again, and want to finish this A1.
Looking good, Antal! With the two-round-hatch configuration, a star on the turret roof was unlikely. It would probably have been placed on the engine deck instead. This one is going to look great when done; add-on armor on a cast hull is really unusual.
"You could probably use some armor. A Sherman can give you a very nice...edge!"
Beekster: thanks the info about the stars. I've problem with the reg. numbers, because, they're not visible in the pictures. I'll search some similars, like on other tanks of the same AD.
I'got a little check list from the missing parts of the model, not so musch left to do. Fender holders, tool holders, and some tiny bits. Than comes the painting.
Antal, all wet-stowage M4A1s were built by Pressed Steel Car, with castings by General Steel or Continental Steel foundries. They differ in the shape of the driver's hoods, which is irrelevant to your build because of the additional armor. Your turret has the ventilator on the back, which places it's production in the second quarter of 1944. The tank itself was likely built in the summer of '44, on one of several contracts issued to PSC. This is a guess, but likely registration number ranges are:
The earliest sequence is not listed; there were 126 tanks and all would have had the early turrets with no rear ventilator. Figure the first couple of hundred numbers of the first sequence above also had that. IMO, the middle two sequences are most likely but if you find legible registrations from other tanks in the unit then that will narrow it down. Whole battalions drew new equipment all at once, so sequential serials were likely.
Last Edit: Oct 13, 2014 10:36:32 GMT -5 by beekster: punctuation - Back to Top
"You could probably use some armor. A Sherman can give you a very nice...edge!"
Antal, can you pull the bow MG out or is it glued in there? I would consider opening up the oval hole for it; the original picture looks like it has normal range of motion and your picture above seems to show not much room for movement in elevation. Could be an artifact of the angle of your photo, too, so I could be wrong here. Other than that, it's looking superb!
"You could probably use some armor. A Sherman can give you a very nice...edge!"
Beekster, You founded the week point of the project. I positioned the hole for the MG a bit low, and the clapms too. I hesitated to remove the added armor, but decided, don't think will to do that.
I decided to remove the add on armor, and used it as a base, worked a new one. Fortunately found some spare tasca parts in my stash, so I detailed it with them. Only some welds are missing.
More images from the front, please! The side view of the revised armor layout looks perfect; the bow MG is nicely centered in the hole. Personally, I'm glad you decided to take the time to rework the applique armor. I've done similar things myself, leaving something alone that wasn't quite right. And I always end up regretting it, and sometimes putting the project aside for a while. And then I get back to it and do whatever is required to make it right. It's going to be a stunning model.
You didn't happen to draw up a template for that armor, did you? Or write down some measurements? I'm sure several of us would like to tackle this or a similar project in the future.
"You could probably use some armor. A Sherman can give you a very nice...edge!"
This is a very interesting project as any Sherman tank is a favorite of mine. I've always wondered why no one (model companies) has released this version as the photo is so familiar in almost all the Sherman books.
It's on the back burner but I wouldn't mind building one too!
Dragon does the basic tank model you'd need, it's the "Operation Cobra" boxing. All that would be needed is the bow armor. Antal, excellent work, and progress. I'm the same way, finding something out about that is "fixable" means I've gotta do it.