I started this Tamiya Jumbo while doing painting demonstrations for my club. I decided to go ahead finish it. I started by painting the whole thing flat black and then over spraying that with olive drab. I did some shading with lighter shade of OD and then did an overall oil wash of olive green.
Oil wash.
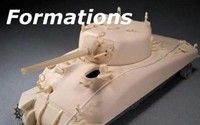
I moved on to the next step. On the turret using the same color that I used for the shading I highlighted certain raised details with a brush.
Next I applied another oil wash of olive green and raw umber. You can see how the wash tones down the brightness of the highlighted areas.
Here's how it looks when dry.
Next I go on to use the out of favor drybrushing to bring more details.
I Did the same treatment to the upper hull as the turret. Once the lower hull is done I will apply a coat of future.
Thanks for looking in and questions and comments are always welcome.
Post by Allied-Eric on Jul 17, 2013 19:41:42 GMT -5
Awesome mini-SBS on painting and the highlighting! People bag on this Jumbo kit from Tamiya. I know the turret is jacked, but other then that its a nice easy build. Great job Mr. T. Keep us posted.
Allied-Eric
Vancouver, WA, USA
AMPS-2652
-In the Ready Rack-
Improvised Assault Sherman-M4A3DS(ETO)
Hyper-Sherman
Crispy-44
Awesome mini-SBS on painting and the highlighting! People bag on this Jumbo kit from Tamiya. I know the turret is jacked, but other then that its a nice easy build. Great job Mr. T. Keep us posted.
Thanks! The casual observer wouldn't be able to tell the difference in the turrrets and it does make a good subject for painting.
Continuing on with the Jumbo project I noticed after painting that I needed to add some details. The Tamiya kit is lacking in several details that if you can add will greatly add to the finished model. So with that in mind I will be adding weld beads, straps, hinges, brackets, and etc. The stuff I will be doing will fairly easy and cheap to do.
The mantlet on the jumbo is missing a weld bead so this is where we shall begin. The first thing I made groove with my saw to place my weld bead material. In this case I used solder wire.
Next I used super glue to attach the wire into the groove and then trimmed the excess wire.
To add the weld texture I used a sculpting tool to make small shallow impressions in the wire.
After going around the wire this is the result. A very easy thing to do that adds missing detail.
I will going across the model adding similar detail so stay tuned for further additions.